- A Rails object is unexpectedly being created (use
after_createfor debugging) - A Rails object is unexpectedly being updated (use
after_updatefor debugging) - A Rails object is unexpectedly being destroyed (use
after_destroyfor debugging) - How does Rails keep track of when the last write happened?
- Rails keeps a
last_writeattribute in the session that is an integer of the seconds since epoch. So, if your delay window is set to be 2 seconds, for example, anyGETrequest that comes through will do a check against thatlast_writeattribute. If thelast_writewas less than 2 seconds ago, Rails will ensure that all reads in thatGETrequest come from the primary database instead of the replica. If thelast_writewas more than 2 seconds ago, the replica will be used for reads.
- Rails keeps a
- Is the “read your own write” guarantee table specific, or is it database wide. In other words, if a write takes place in table A, and then a read from table B happens within the delay window, does it use the replica for that read?
- No, It is not table specific. Any table being read from in a
GETrequest that takes place within the delay window after aPOSTrequest will be read from the primary database.
- No, It is not table specific. Any table being read from in a
- If a write takes place during a
GETrequest (this is not restful but there are times where it can make sense), does that write automatically happen in the primary database.- No. Any write that takes place in a
GETrequest will be attempted in the replica. Ensuring that this write take place in the primary database requires updating the code (details in “Code Changes Made” section below).
- No. Any write that takes place in a
- If a
GETrequest happens to do a write to the database, will any subsequent read in that request automatically read from the primary because of the “read your own write” guarantee?- No. All reads in a
GETrequest will come from the replica regardless of what has taken place is the request, and this is because thelast_writesession attribute, which is what is used to determine if the primary db should be read from, cannot be set in aGETrequest even if that request does a write.
- No. All reads in a
- Look at every
GETrequest (found these by runningbundle exec rake routs | grep GET) in the app in an effort to find anyGETrequests where writes were taking place. Any writes that we found were wrapped in the theActiveRecord::Base.connected_to(role: :writing)block (see docs for details). - Create a new mysql (applies to postgres as well) user with read only access and update your database.yml file to ensure your replica uses the credentials for this user. This will ensure an error will be thrown if a write is attempted in a
GETrequest. - create
app/assets/config/manifest.jsfile and paste in the following.//= link_tree ../images //= link_directory ../javascripts .js //= link_directory ../stylesheets .css - Move
Rails.application.config.assets.precompile +=fromconfig/initializers/assets.rbto newapp/assets/config/manifest.jsfile. - Better Snap Tool - The ultimate tool for organizing and managing windows on mac
- OnePassword - Best password manager I know of
- Alfred - Worth the price for the paste history alone, but also has some great customization features for becoming a mac power user.
- vim-mode-plus - allows you to use vim commands in the editor
- Bracket Colorizer - makes it way easier to find where your brackets start and end
-
_I can use
_in the rails con set a variable to the return value of my last expression. For example, if I doUser.where(email: foo@bar.com), I can then douser = _and it will setuserto the return value ofUser.where(email: foo@bar.com). -
reload!This will load the latest code into the rails console environment. This will prevent you from having to close and reopen your rails console every time you make a change to the code.
-
git commit --amend --no-editI have an alias for this and I use it more than I would like to admit. My typical use case is I make a commit and then realize I missed a piece of code that should have gone in with that commit. After realizing this I simply do
git add file-i-changed,git commit --amend --no-edit, and thengit push --force(be very careful with force push; I only do it on branches that I alone am working on). -
git logAllows you to see the commit history in your current branch; it comes in handy all the time.
-
git cherry-pickI am constantly amazed by this command. It allows you to take a commit from one branch and put it in another. For example, if I am currently working on the
foobranch and want to take a commit with a sha of1234from thestagingbranch. I would simply dogit cherry-pick 1234and it will put that commit on top of the commits in myfoobranch.
Just wanted to post a link (below) to my recent appearance on the Ruby Rogues podcast. The conversation centers around imposter syndrome, how to succeed as a developer, and engineering team culture. It was a blast talking to these guys! Thanks to them for having me on!
I’m going to take a slightly different approach with this post and talk about a very cool and timely ruby gem called kovid that I recently discovered and contributed to this weekend.
The Gem
Ever since the pandemic began I’ve been wanting an easy, centralized way to get COVID-19 data, and this gem is exactly that. It’s a CLI tool that you can use to get worldwide data, to compare data from various countries, and even compare data at the state level in the United States. See the docs for more info.
My Contribution
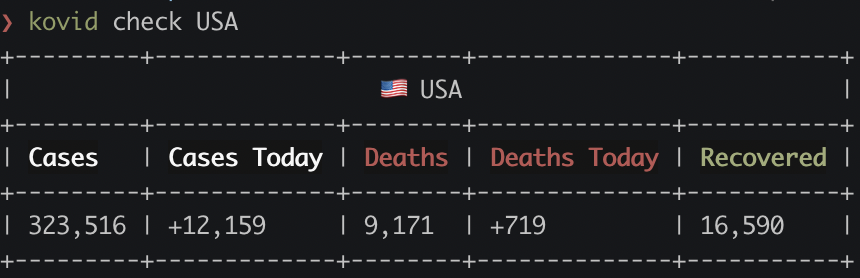
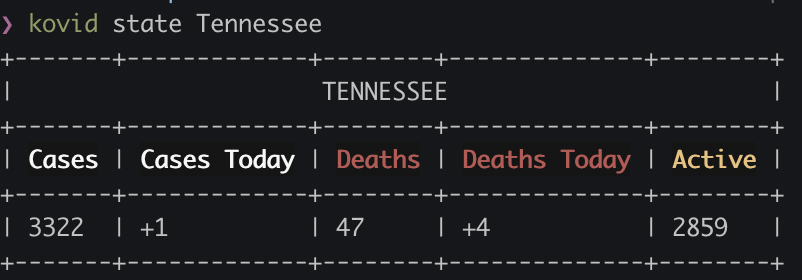
This week I got into a routine of running kovid check USA and kovid state Tennessee (see output below) every morning before work just to get a sense of how things are going, and after a couple of days I realized it would be great to have the ability to see a table of all the US states for comparison. The docs listed a feature that allows you to do kovid states Florida Tennessee, for example, to compare multiple states, but it wasn’t working and there wasn’t an easy way to get data on all of the states at once without typing them all out. So, I figured I’d take some time to fork the repo this weekend and take a stab at adding this country wide data feature and also look into fixing the issue with state comparison.
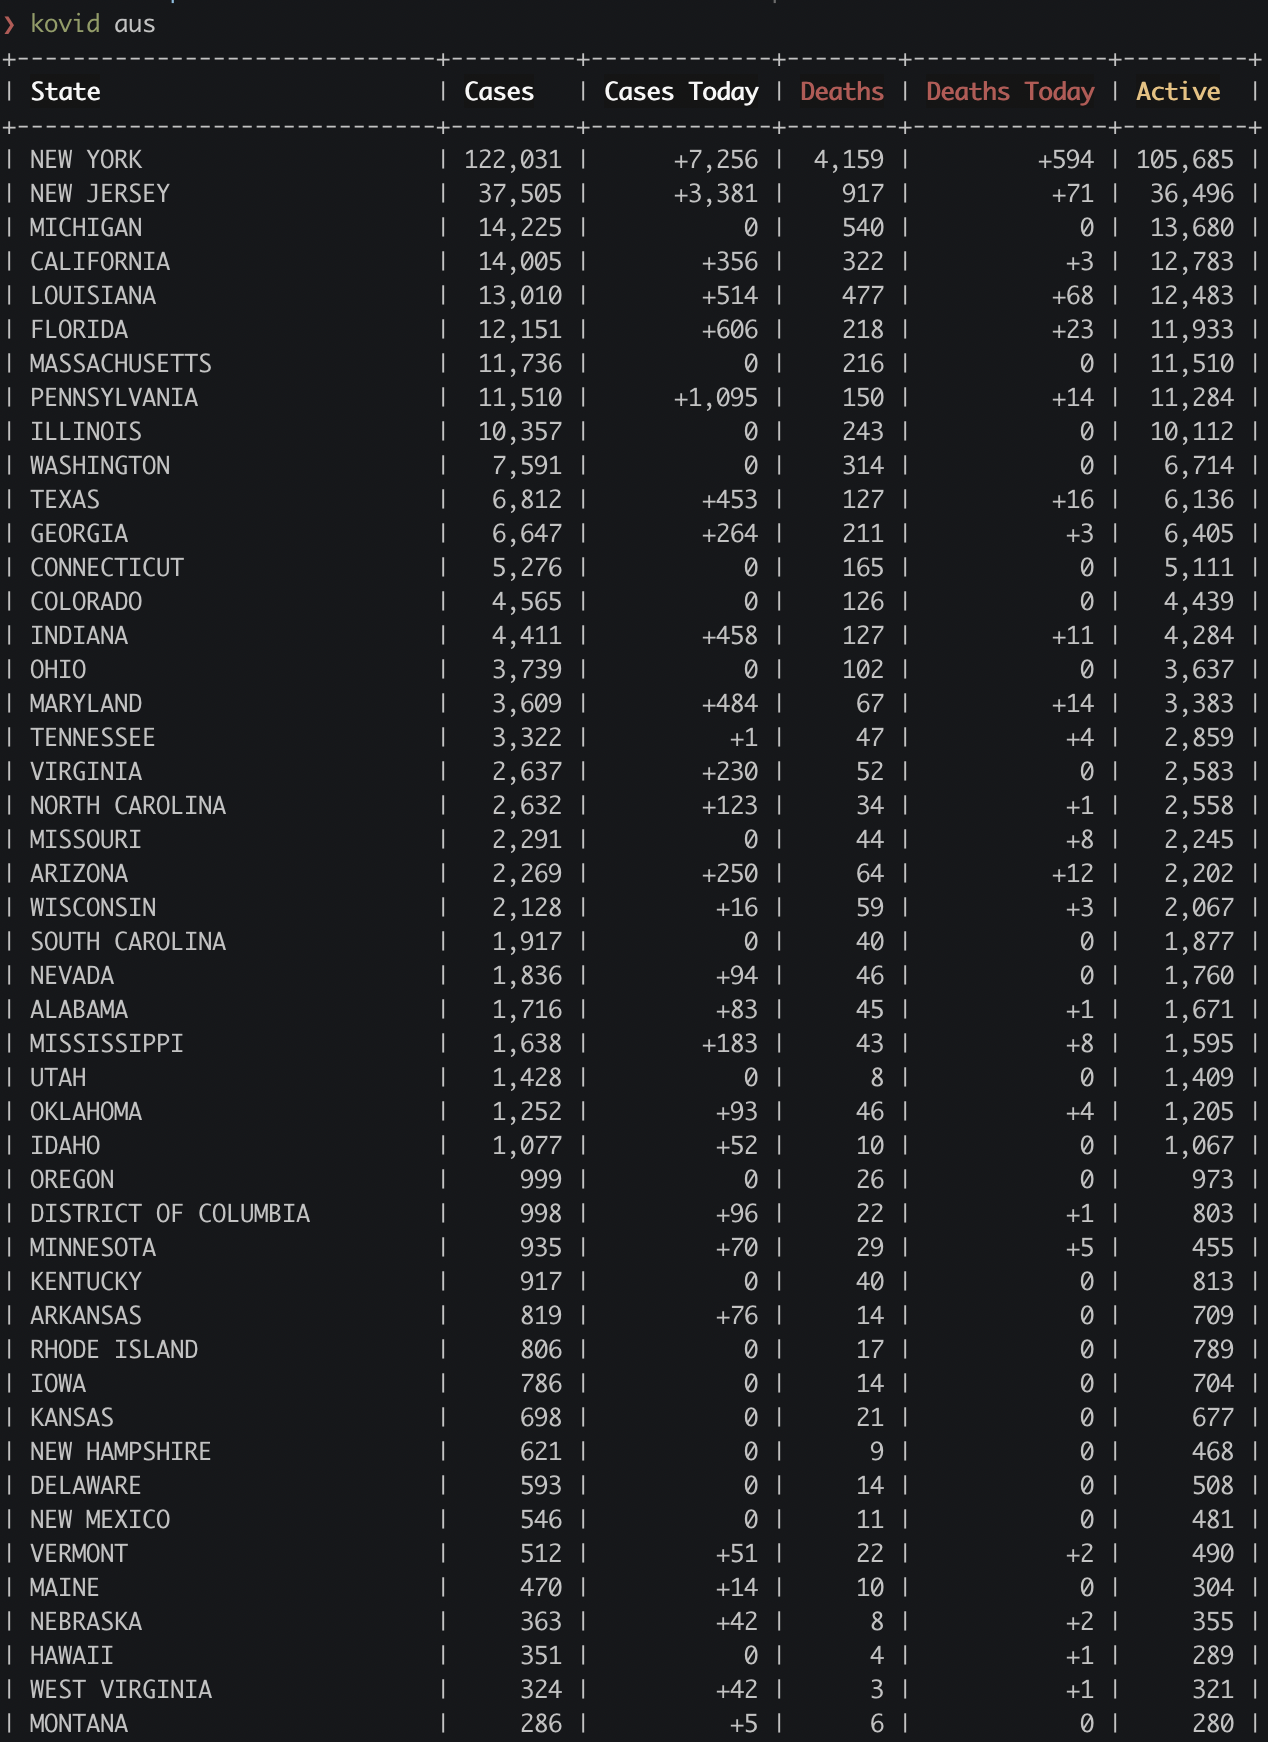
After having a bit of struggle getting things set up for local development, I was good to go. I got the country wide feature added, and I fixed the bug with state comparison (see my pull-request here if interested). If you now run kovid aus you will see all US states listed in order of COVID-19 cases descending.
Conclusion
This was my first time contributing to an open source project in my free time, and I must say I found it deeply satisfying. I got to work within a design pattern that is new to me, I got to collaborate with other rubyists across the world, I got the feature I wanted and can now use, and I made the gem a little bit better. I hope to contribute more features in the future, and I hope others find the gem useful during these tough times.
I learned a great ruby tip this week for getting a specific list of methods available on an object, so I thought I’d make a post about it. The first part of the post explains the tip, and then the second part goes into how I recently used it.
Question
Is there a way to quickly see a list of all of the methods available for a ruby object that does not include the methods that object inherits from the Object class?
Answer
Yes. {your_object.methods} - Object.methods
Details
I have been using the methods method for a long time and have always found it a bit annoying that the result of calling {your_object.methods} always includes the methods on the Object class. It makes perfect sense why this is the case, but typically when I am in search of available methods I only care about seeing the methods that are specific to the object I am troubleshooting. So, to get around this we can leverage ruby’s - method to get a list that is not polluted with the methods we don’t care about.
The Bug I Was Working On
While the list of situations where this tip could come in handy is endless, I wanted to quickly explain how I used it this week so people can see an example.
At GoNoodle we’ve recently been betting a lot of errors while uploading users to CloudSearch. It’s been a bit tricky to debug because it happens intermittently with no clearly discernible pattern (the best type of bug), so instead of endlessly spinning my wheels on the issue I decided to leverage our BugSnag integration. The method looked like this before I added my debug code:
  def upload_documents(documents)
    @client.upload_documents(documents: documents.to_json, content_type: 'application/json')
  end
and afterwards it looked like this:
  def upload_documents(documents)
    begin
      @client.upload_documents(documents: documents.to_json, content_type: 'application/json')
    rescue StandardError => e
      Bugsnag.notify("Cannot be added to CloudSearch. documents:#{documents}, message: #{e.message}, code: #{e.code}")
    end
  end
What this new code does is ensure that we get a BugSnag notification (with details) every time an Aws::CloudSearchDomain::Errors::DocumentServiceException exception is raised (this is what happens when a user is not uploaded to CloudSearch).
How I Used The Tip
When I was implementing the code above I could not remember the Exception methods that were available for providing details on the exception (code and message), so I quickly put a binding.pry (see pry) in the rescue block and ran e.methods - Object.methods and got the following list: [:code, :message, :full_message, :backtrace_locations, :backtrace, :cause, :exception, :set_backtrace, :blamed_files, :describe_blame, :copy_blame!, :blame_file!]. This gave me exactly what I needed!
Conclusion
In summary, the next time you find yourself wondering what methods are available on an object and you don’t care about seeing the methods from the Object class, run {your_object. methods} - Object.methods and you should be good to go!
Throughout my career as a Rails developer there have been a number of times that using Rails callbacks for debugging purposes has come in handy and saved me a ton of time and frustration, so I thought I’d take some time to share this approach. To put it simply, if you’re seeing any odd behavior relating to a Rails object being created, updated, or destroyed, this may be a way for you to easily get to the bottom of what is going on. Some might argue this approach is a bit hacky, but when it comes to debugging I think anything goes as long as it gives you the right answers.
When To Use Callbacks for Debugging
While this technique could be used for any of the Rails callbacks, I have mostly used it in the following contexts.
How To Use Callbacks for Debugging
The implementation of this is relatively simple; if one the aforementioned unexpected behaviors is occurring, put the related callback in the correct model with a binding.pry (see pry) and use caller (see caller) to help identify the source of the unexpected behavior. Let’s look at a simple example.
Models
class Team < ApplicationRecord
  has_many :players

  def create_player(name:)
    players.create(name: name)
  end
end
class Player < ApplicationRecord
  belongs_to :team
end
Factory
FactoryBot.define do
  factory :team do
    trait :bucks do
      name { 'Bucks' }

      after(:build) do |team|
        team.create_player(name: 'Giannis Antetokounmpo')
      end
    end
  end
end
Test
describe Team do
  let!(:bucks) { create(:team, :bucks) }

  describe '#create_player' do
    let(:team) { create(:team) }

    it 'creates a player' do
      team.create_player(name: 'John')

      expect(Player.count).to eq(1)
    end
  end
end
This test is going to fail because the player count will be 2 and not 1. The reason for this is that let!(:team) { create(:team, :bucks) } (specifically the :bucks attribute) causes the Team factory to create the Giannis Antetokounmpo player for that team, so when team.create_player(name: 'John') is called there is already an existing player. See factory_bot for more info. While this is relatively easy to spot in this simple example, in a real world situation the let!(:team) { create(:team, :bucks) } could be hundreds of lines above the failing test, and getting to the bottom of why this test is failing could take a long time. This is where using callbacks comes into play, so let’s add that now.
class Player < ApplicationRecord
  belongs_to :team

  after_create :debug_test_failure // Callback added for debugging

  def debug_test_failure
    binding.pry
  end
end
When I run the test again with this debug_test_failure callback I will hit the binding.pry every time a player is created. Once this pry is hit I can call caller to see the execution stack, which will point me directly to code that is creating the player. For this test my binding.pry will be hit twice (once for let!(:team){ create(:team, :bucks) } and once for team.create_player(name: 'John’)), and it’s on the first hit that I will be pointed to the line of code that is the culprit. From there I can fix the test accordingly and then remove the debugging callback I added to the player model.
It is worth noting that the simple example above, while helpful for capturing the technique of using callbacks for debugging, does not fully illustrate the full potential of this technique. It’s when you’re dealing with code bases that have evolved over years and have many dusty corners that this can really save you a ton of time and frustration. So, hopefully the next time you are scratching your head over the source of some unexpected Rails object behavior, you can apply this approach.
I was recently tasked with upgrading our codebase at GoNoodle from Rails 5.2.3 to 6.0.1 , and I wanted to take some time to document my experience and share some tips that others might find helpful. My main objective here is to articulate what I learned, and to draw attention to any hang ups I ran into that were not directly addressed in the Rails migration guide. It is worth noting that because this was my first time doing a major update, some of what I mention will be version update agnostic and will just be general Rails upgrade tips, but the rest will be specific to this version upgrade.
Setting Up Multi Database Support
The multi database support in Rails 6 is something we were really excited about, and while the docs for setting this up were by no means bad, there were some things that were left a little unclear. Here are some of my findings.
Handling automatic connection switching
To take full advantage of the Rails multi database support, we set up most of our models to read from our replica, and we activated automatic connections switching. When we first started implementing this we realized we were a little unclear about how this all worked, and in an effort to be sure we were implementing everything correctly we took some time to do some testing and answer some questions (listed below with answers) relating to the portion of the docs outlined below.
“If the application is receiving a POST, PUT, DELETE, or PATCH request the application will automatically write to the primary. For the specified time after the write the application will read from the primary. For a GET or HEAD request the application will read from the replica unless there was a recent write. Rails guarantees “read your own write” and will send your GET or HEAD request to the primary if it’s within the delay window”. - Rails Docs
Questions Asked
Once we were confident in the answers to these questions we updated our code by doing the following.
Code Changes Made
How to rollback a migration that is not in your primary database
Doing rails db:rollback will rollback your most recent migration (these migration files are in db/migrate in your primary database, but if you want to rollback a migration in another database (these migration files are in db/[name_of_your_db]_migrate) you need to do rails db:migrate:down:[name_of_your_db] VERSION=[migration_version_number].
manifest.js
After successfully updating the Rails version I got the following error when trying to run the app locally. Expected to find a manifest file in app/assets/config/manifest.js. To handle this I had to do some digging and found the following post by Richard Schneeman, which directed me to do the following.
Updating Gems
The first thing I did to get started was to update the Rails version in the gemfile and run bundle update rails, and this resulted in the following error. Note that while my subsequent explanation will apply to the actionpack scenario listed below, the core way to address this error applies to all gems.
Bundler could not find compatible versions for gem "actionpack":
  In Gemfile:
    active_model_serializers (~> 0.10) was resolved to 0.10.9, which depends on
      actionpack (>= 4.1, < 6)

    active_admin_datetimepicker (~> 0.6) was resolved to 0.6.3, which depends on
      activeadmin (~> 1.1) was resolved to 1.4.3, which depends on
        formtastic (~> 3.1) was resolved to 3.1.5, which depends on
          actionpack (>= 3.2.13)

    active_admin_datetimepicker (~> 0.6) was resolved to 0.6.3, which depends on
      activeadmin (~> 1.1) was resolved to 1.4.3, which depends on
        inherited_resources (>= 1.9.0) was resolved to 1.10.0, which depends on
          has_scope (~> 0.6) was resolved to 0.7.2, which depends on
            actionpack (>= 4.1)

    active_admin_datetimepicker (~> 0.6) was resolved to 0.6.3, which depends on
      activeadmin (~> 1.1) was resolved to 1.4.3, which depends on
        inherited_resources (>= 1.9.0) was resolved to 1.10.0, which depends on
          actionpack (>= 5.0, < 6.0)

    lograge (~> 0.11) was resolved to 0.11.0, which depends on
      actionpack (>= 4)

    rails (= 6.0.1) was resolved to 6.0.1, which depends on
      actionpack (= 6.0.1)

    rails-controller-testing was resolved to 1.0.4, which depends on
      actionpack (>= 5.0.1.x)

    active_admin_datetimepicker (~> 0.6) was resolved to 0.6.3, which depends on
      activeadmin (~> 1.1) was resolved to 1.4.3, which depends on
        ransack (>= 1.8.7) was resolved to 2.1.1, which depends on
          actionpack (>= 5.0)

    responders (~> 2.4) was resolved to 2.4.1, which depends on
      actionpack (>= 4.2.0, < 6.0)

    rspec-rails was resolved to 3.7.2, which depends on
      actionpack (>= 3.0)
The issue here is that actionpack, because it is a gem that ships with Rails, is trying to upgrade to version 6.0.1, but one or more of my gems has a sub-dependency that requires an actionpack version < 6. The confusing part about this error is that not all of the gems listed here are at fault, so it’s important to know where to look when addressing this error. active_model_serializers (the first gem mentioned here), for example, is one of the offending culprits because it requires actionpack (>= 4.1, < 6). lograge, however, is not one of the offending culprits because it requires actionpack (>= 4). After figuring out how to navigate these error messages is was just a matter of updating the gem version of the offending culprits to versions that support actionpack 6.0.1.
All in all the upgrade experience, aside from a major hangup we had with our mysql_online_migrations gem (see details here if interested), was fairly straightforward and painless, and I definitely learned a lot. Lastly, I want to give a shout out Travis Roberts for all of this help during this process. His contribution was invaluable.
After giving it some thought, I’ve decided to write a post cataloging the various tools, tips, tricks, and commands that I could not live without. These have been gathered over the past three years, and I know that a list like this would have been invaluable to me when I was first getting started. Luckily I had a lot of great people around me to clue me in to this stuff, but for those who are not so lucky, I hope this post is helpful.
Software
Editor Plugins
These plugins are specific to atom, my editor of choice, but if you don’t use atom you should still be able to find something very similar.